
5 Tips for Deadlifting Beginners
You’ve been training for just about a year now. You’ve read every muscle magazine and body building article. On your quest for fitness and physique, you find throughout each article you read or page you turn, there seems to be one exercise you can’t escape: the deadlift.
The deadlift seems to find its way into everything you’ve been reading. You’ve looked at the pictures and watched the videos, and you’re finally feeling confident to add deadlifting into your lower body training. When you get to the gym, you load a plate on each side, visualize the picture you saw earlier on the Internet, and go to work.
Everything was great; the lift was challenging, and you were sweating and feeling good. Then, the next morning comes and you’re heartbroken. Instead of sore hamstrings, glutes, and quads, your back is stiff and sore. A few days pass and you’re finally getting over your lower back soreness, but now you’re questioning if deadlifts are good for you or if you’re better off keeping them out of your program.
When done correctly deadlifting is one of the best exercises for building lower body strength and developing your glutes, hamstrings, and quads. You must also respect that alongside these benefits and satisfaction it is one of the most technical lifts. When deciding to deadlift you want to make sure that you’re doing everything you can to set yourself up for success and that you’re actually training your glutes, hamstrings, and quads, rather than taxing passive structures of your back. If the above story is familiar to you, or you’re a first time deadlifter, use the steps below as a guide for ensuring future deadlift success.
1. Learn How to Hip Hinge
The word technique is thrown around daily in the gym. Having sound technique is extremely important for being able to stay healthy while keeping any one lift in your training program for an extended period of time. But in order to have a chance at achieving good technique, you must meet certain movement pre-requisites. When it comes to deadlifting, that movement pre-requisite is the hip hinge. Having the mobility and motor control to move through hip flexion and extension while maintaining a neutral spine is the underlying key to achieving your deadlifting goals. When you lack the ability to do so, you’ll often compensate through excessive lumbar flexion or extension or an over-rounding of your upper back. Before ever touching a weight, master your hip hinge and feel comfortable knowing where your body is in space at the bottom and top portions of the hinge.
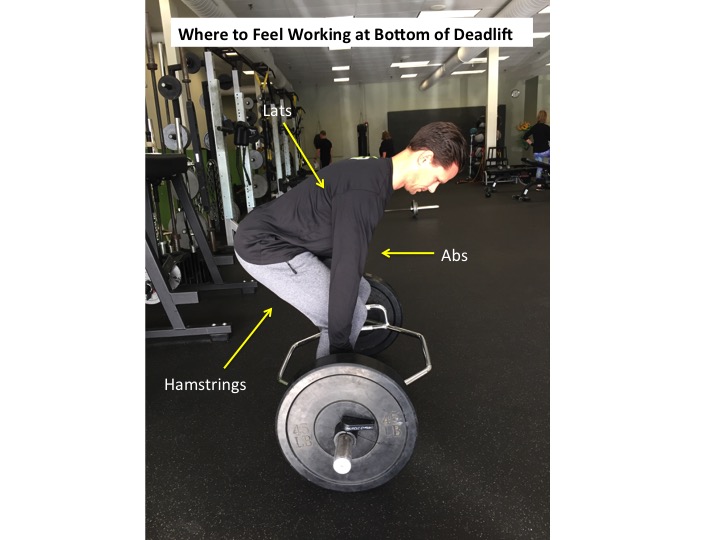
2. Build Tension in the Right Areas
Learning how to build tension in the right areas is how you will create leverage with your hamstrings, glutes, abs, and lats instead of over-relying on your back extensors and other passive structures of your spine. We’ll talk about deadlift variations later on, but regardless of what variation you decide to do, spend some time holding your set up position and practice positioning your body so that you have tension in your hamstrings, glutes, abs, and lats.
3. Create a Checklist
Building tension in the appropriate areas is almost impossible without creating a checklist while in the bottom position. Hip hinge down to the weight and begin building tension. First going through external cues is important to make sure you’re in a good position. Then, internal cues become even more important to ensure that you’re using the right muscles during the lift. A typical checklist that I’ll create with a client will look like this:
External Cueing Checklist
Imagine that there is a wall behind you. Hip hinge down to the weight and try to tap your butt to the wall.
Check that you have a straight line knees down to your heels.
Pull your chest taller, so someone in front of you can see the logo on your shirt.
Internal Cueing Checklist
Crush the bar in your hands; squeeze as hard as you can to build tension through your arms, lats, and back of shoulders.
Push your butt back to your heels more and feel hamstrings start to build tension.
Squeeze your abs hard!
Squeeze hard under your armpits and slightly squeeze shoulders back to build more tension in your lats and upper back.
If using a barbell, take the slack out of the bar to build even more lat tension
This can be a lot of mental work just during the set-up, but once you’ve mastered both of the lists above, you can quickly set-up by hinging down to the weight and going through a shortened list that may look like.
Deadlift Quick Checklist
Straight line knees to heels and feel hamstring tension
Feel abs working hard
Crush handles and squeeze hard under armpits
Push feet hard through the floor while hips and shoulders rise together
Squeeze butt at top of lift.
Don’t mentally freeze yourself here, but it’s important to place a premium on technique. The more you practice with submaximal weights, the smaller your checklist will become, and the more the movement will become second nature.
4. Don’t Begin With the Barbell
Very rarely should your first experience with deadlifting be with a barbell. A conventional deadlift has a robust list of mobility pre-requisites, and if they’re not met, it’ll make getting into an optimal position impossible and often lead to compensation in either your lumbar or thoracic spine. Choosing a variation that allows you to decrease the range of motion, mobility demands, and external load is the next most important thing after mastering your hip hinge. Consider the below deadlifting options prior to conventionally deadlifting off the floor:
Cable Pull-Through

Benefits of Cable Pull-Through
Resistance from the cable can be used as assistance to guide your hips back into hip hinge.
Decreased spinal loading
Kettlebell Deadlift
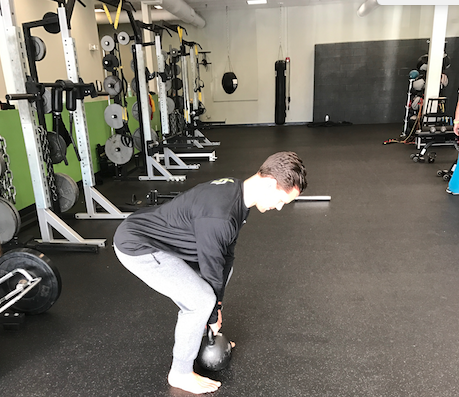
Benefits of Kettlebell Deadlift
Easier to control the weight because it is closer to your center of gravity
Allows you to take a wider stance which may allow you to get hips & back in a better position
Easier to progress resistance because you can start at a lower weight
Trap Bar Deadlift

Benefits of Trap Bar Deadlift
Easier to control the weight because it is closer to your center of gravity
The trap bar sits higher off the floor than the barbell, so it is a viable option for those who lack the mobility to safely conventionally deadlift
Elevated Conventional Deadlift

Benefits of Elevating the Conventional Deadlift
Allows those with mobility deficits to safely train the conventional deadlift.
Sumo Deadlift

Benefits of Sumo Deadlifting
A narrower stance deadlift requires good hip internal rotation and adduction range of motion. If you're lacking either or both it will make setting up in a conventional deadlift difficult without compensation occurring in your lumbar spine.
Taking a wider stance will accommodate your hip range of motion and allow you to set up in your deadlift with a neutral spine and allow you to better leverage your lower body muscles.
5. Invest in Lighter Bumper Plates

It can be difficult finding a way to set-up your deadlift early in your career. Most gyms only have 45lb. plates, and if you’re deadlift isn’t up to 135 lbs. quite yet, using 35lb., 25lb., or 10lb. plates will make the bar too low for you to set up in an ideal position. Finding a gym that has 25lb. and 10lb. bumper plates will make your life much easier when building your deadlift.
In Summary
Deadlifting is a phenomenal lower body exercise; there’s no better way to build lower body strength and develop strong glutes and hamstrings. You must appreciate how much goes into the deadlift and how much work you must put in up front—practicing technique, leveraging the right muscles, and building work capacity with good technique—before hitting the heavy weights. Learn to hip hinge, choose a smart variation to start, create checklists, and build tension in the right areas and you’ll be on your way towards long-term deadlifting success.